
Basic Home Network Security – NAS (Part 2)
Basic NAS Security Guidelines
First of all with all the different models of NAS devices, we have put together a simple guide detailing key steps towards securing your NAS. It is impossible to give a one size fits all guide to securing your NAS. Instead, focus on learning these principles and the reasoning behind them. Once you learn what to look for and why, you can find specific instructions for your NAS from the manufacturer’s website.
- Implement strong password security. …
- Ensure that NAS firmware is routinely updated. …
- Never use default admin accounts. …
- Secure your connection and ports. …
- Make use of your NAS firewall. …
- Enable DoS protection. …
- Use a VPN whenever you use your NAS
Admin Accounts and Passwords
Always change the default password for the administrator account. If possible, create a new administrator account with a different name and delete the default “admin” account, as brute-force attacks only work by repeatedly trying to guess the password for this account.
Enable SSL![]()

When you access your NAS via the web interface, you should see “https://” at the beginning of your address bar along with a padlock, indicating your connection is encrypted. If this isn’t enabled by default, turn it on. Otherwise, your credentials are transmitted in the open and available to potential attackers.
Only Enable What’s Necessary
Your NAS can run various web apps that will be accessible over the net. Only enable what you need and if you open a port on your router to access your NAS from the Internet, make sure you are using a strong username and password. Consider enabling any filtering or auto-blocking features your NAS offers to eliminate brute-force login attempts.
Use a VPN
If your NAS can run a VPN server, you can use this when away from home to access your device securely. When you connect to the VPN, you’ll have access to your local area network (LAN). This means you only have to open up a port on your router for the VPN, greatly reducing the attack surface for your NAS.
Connecting to your NAS via a VPN is one of the best ways you can keep your NAS secure. Check the manufacturer’s website to learn how to set up a VPN on your specific device. Also make sure to check out our selection of best VPN providers as well as our overview of VPN reviews to get an idea of what’s available out there.
Following the guidelines above will increase the security of your setup, and they’re easy steps to implement. Now, we’ll look at some specific features offered in the various Synology and QNAP devices.
Securing a Synology NAS
Synology devices offer users several options to lock down their NAS and enhance security. We’ll start by removing the default account and creating a new one with a secure passphrase.
Create a New User
Step 1. Login to DiskStation Manager and from the main menu click “control panel” then click “users.”
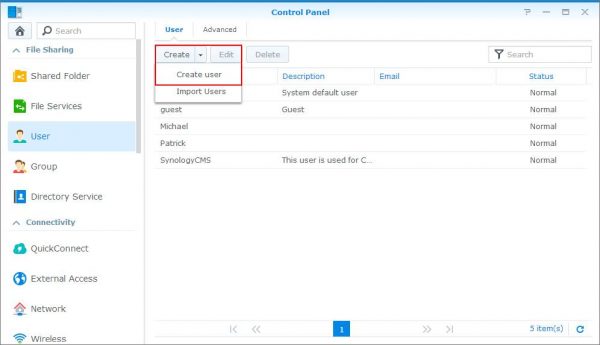
Step 2. Click “create,” then click “create user.”
Step 3. Enter the username and password of your choice, then click “next.”
Step 4. Click the “add” checkbox to add your new user to the “administrators” group, then click “next.”

Step 5. Give the new administrator account access to all folders by ticking the “read/write” box, then click “next.” Click “next” again, unless you want to set a disk quota.
Step 6. Tick the “grant” box to give the new admin account access to applications, then click “next.”
Step 7. Click “next” at the to skip setting a speed limit, then click “apply.”
That’s it, you now have a new administrator and can proceed to disable the old admin account.
Disable the Admin Account
Step 1. Log out of the DSM and then log in with the newly created administrator account.
Step 2. From the main menu, go to “control panel” and click “users.”
Step 3. Click the “admin” account, then click “edit.”
Step 4. Tick the box for “disable this account” and click “ok.”
Now that we have a new administrator account and have disabled the old default account, let’s look at setting up two-step verification.
Two-Step Verification for Synology NAS
This process requires a mobile phone with an authenticator app installed, such as Google Authenticator. Install the app now before you continue. You’ll always need your phone when logging into DSM.
Enabling two-step verification means that an attacker attempting to access your account needs your password as well as your phone, greatly reducing the possibility of compromise.
Step 1. Click the user icon, then click “options.”

Step 2. Tick the “enable 2-step verification” to launch the wizard. Click “next.”
Step 3. Enter an email address in case your phone is lost. Click “next.”
Step 4. Open the authenticator app on your phone and scan the QR code displayed by the wizard. Click “next.”
Step 5. Enter the code generated by the authenticator app. Codes are updated periodically, so do this quickly before it expires. Click “next.”
Step 6. Click “close” and click “ok” to save your changes.
You’ll now be prompted to enter a verification code every time you log in to the DSM. While it may seem like a hassle at first, it only takes a few seconds and greatly increases the security of your NAS.
Enabling Auto-Block for Synology NAS
Lastly, we’ll enable auto-block. Attackers use automated tools to scan and exploit other computers, and by enabling auto-block we can blacklist the IP address of any attackers after a certain number of failures.
Step 1. From the main menu, click “control panel,” then click “security.”
Step 2. Click “auto-block,” then tick the box labeled “enable auto-block.”

Step 3. We’ll enter the number five for both “login attempts” and “within (minutes)” here, as this is a safe default.
Step 4. You can tick the box for “enable block expiration” if you want the block to expire after a certain number of days.
Step 5. Click “apply” to save your changes.
You can always edit the block list by going back to this screen and clicking “allow/block list.” Enabling auto-block, two-step authentication and creating a new administrator account are three simple steps towards enhancing the security of your NAS device. Check out Synology’s site for more information – https://www.synology.com/en-uk.
Secure a QNAP NAS
QNAP provides several features built-in that will strengthen the security of your device. Similar to Synology’s auto-block, QNAP offers “network access protection” to block repeated attacks against your NAS. We’ll also use QNAP’s built-in antivirus to keep your NAS clean of any nasty surprises.
Enabling Network Access Protection
Step 1. From the control panel, click “system settings.”
Step 2. Click “security” and click “network access protection.”

Step 3. Click “enable network access protection” and click “apply all.”
You can tick the box for each service that you’ve enabled on your NAS. In general, you should enable network access protection for each service you’ve enabled. Stopping automated attacks is as easy as turning this on.
Enable QNAP’s Antivirus
Step 1. From the control panel, click “applications.”
Step 2. Click “antivirus” and click “enable.”
Step 3. Tick the box for “check and update automatically…” and set the value to one day. Keeping your virus definitions updated ensures your antivirus doesn’t let new malware slip by.

QNAP offers a wealth of features, including SMS/email notifications of unusual activity, setting up your device as a VPN server and far more beyond the scope of this guide.
Check out QNap’s website for more information – https://www.qnap.com/en/.
Disclaimer:
1. Information within this article serves as a general information source only and we are not involved in giving professional advice here.
2. The Website may not cover all information available on a particular issue. Nothing contained on this article constitutes professional advice nor is it to be relied on when making any decision. The information or opinions discussed on this article may not be suitable for you and you should do your own checks or obtain professional advice relevant to your particular circumstances before relying on information found within this article.
3. While we try to ensure that information posted on this article is timely and accurate, sometimes inaccuracies may occur. All information is provided “as is” and without warranty of any kind. No warranty of any kind, implied, express or statutory, including but not limited to the warranties of non-infringement of third party rights, title, merchantability, satisfactory quality and/or fitness for a particular purpose, is given in relation this article and the materials and information within the article.
No Comments